• Skip to main content

Maple Reviews

Felt Toy Animals

General Instructions: Felt Toy Animals Sewing Patterns

December 13, 2019 by David Allen Leave a Comment

Craft Patterns

To enlarge or reduce the size of patterns on this site you can either:

1) Print out the pattern (using your home printer), then take the printout to your local library or printery and enlarge on a photocopier OR

2) Use a computer graphics program to rescale the image on your computer, and then print out the pattern.

Cutting

For cutting out, place the pattern on the felt. Pin into position and cut out carefully. When using fur or material with a right or wrong side, and pairs of a pattern are being cut, the pattern must be reversed for the second piece.

Joining seams

– All seams are glove stitched on the right side of work unless otherwise stated.
– Glove stitch is over-sewing twice into each stitch.

What is appliqué craft?

To appliqué is to secure a smaller piece of felt to a larger felt surface with buttonhole stitch.

How to sew on glass eyes

Glass eyes come in pairs joined together with a piece of wire. Cut the wire 1/2″ from the eye and bend over to form a shank.

Generally it will be found that those animals which were traditionally hunted as prey have eyes at the side of their heads (e.g. rabbits and kangaroos), whilst the hunter animals (dogs, cats etc.) have eyes looking straight ahead.

To insert the eye of toy bunny rabbits, ducklings etc., thread a long needle with strong cotton, pass the needle from one side of the head to the other, thread on one eye and pass the needle back to the starting point; thread on second eye, draw the cotton tightly and tie very securely; cut cotton ends close to eye.

toy sewing eyes

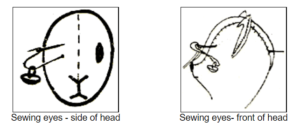
With toy animals whose eyes look out straight in front, each eye is looped on to a separate doubled thread and the needle inserted in the eye position and passed through to back of neck. Pass needle back to starting point, draw the cotton tightly and tie securely, cut cotton ends close to eye. The finished eyes should be well sunken into the head.
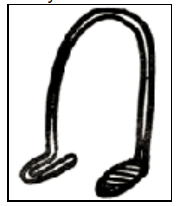
Support for Legs

Bend a piece of wire to make an arch, and bend ends for feet. Bind the feet and rough ends with adhesive tape or strips of material, 16 gauge wire is normally used.

Support for Legs

Filling

When stuffing wire figures, be sure to pack the filling around the wire and avoid lumpiness (!). Use a wooden skewer to push filling into small areas, e.g. paws, feet, legs, etc. Brushed nylon filling is recommended as it is clean, non-allergic and retains its softness and pliability.

Kangaroo, Bambi Deer and Bunny Rabbit

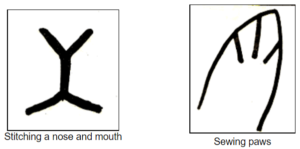
How to stitch nose and mouth – see illustration below.

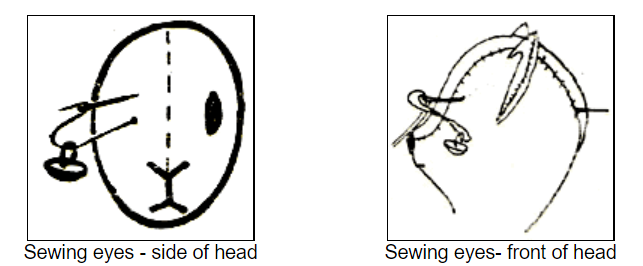
Craft stitches for Bunny Rabbit and Kangaroo Paws

See illustration below.
stitch nose sewing paws

Filed Under: Felt Toy Animals

Felt Toy Sewing Accessories

December 13, 2019 by David Allen Leave a Comment

Facts about Felt
Toy felt is colourful, there are a multitude of colour available, it is light, easily worked and sewn and it will also glue.

Felt is also washable, hygienically clean and most economical to use.

The patterns on this site suggest colours you can use to make your animal creations – however feel free to experiment!! Purple elephants and Orange frogs with multi-coloured arms and legs are great!

Glass Eyes and buttons for toys
There are a myriad of glass eyes available. Keep to natural animal eye colour and your toys will be more realistic. Swap glass eyes for buttons for a cute factor.

Filed Under: Felt Toy Animals, Uncategorized

Toy Scottie Dog Sewing Pattern

December 13, 2019 by David Allen Leave a Comment

Free Toy Felt Scottie Dog Sewing Pattern

Approximate height: 7 1/2″

Materials required:

  • Pattern
  • Felt: 30″ x 12″ Black
  • Felt: Small piece of red for tongue
  • Stranded cotton: 1 skein Black
  • Pair Brown Glass Eyes
  • Short length of ribbon for Dog collar
  • Wire – 16 Gauge – 2 pieces each 12″ long
  • Filling

Download Toy Scottie Dog Sewing Pattern = >>>
(requires Adobe Acrobat Reader)

Preparation

Cut 2 side body, 2 underbody, 2 ear, 1 head gusset, 4 sole, 1 nose and 1 red tongue. Prepare wire for legs (see General Instructions).

How to make the felt toy Scottie Dog – Sewing instructions

All seams are glove stitched on the right side unless otherwise stated.

Using two strands of cotton, join underbody seam from A to B on the wrong side. Join the two side bodies from G to A. Insert the head gusset and join to side bodies from G over the head to I.

Join seams along the back to H and over the tail to B. Join underbody to side body from A to E and from B to F. Join legs C to J and D to K.

Stitch a sole into the base of each foot, placing X of sole to the back. Push a little stuffing into each foot. Bend the wire to shape insert into the legs and stuff.

Join underbody to sidebody from J to K and then complete the stuffing.

Stitch the remaining seam from J to K.

Sew the ears on each side of the head as position marked on Pattern. Sew in eyes (see General Instructions). Stitch nose darts and sew into position. Sew tongue in place on lower edge of nose piece.

Tie a ribbon bow around the Dog’s neck.

Woof!

Filed Under: Felt Toy Animals

Toy Mouse Sewing Pattern

December 13, 2019 by David Allen Leave a Comment

Free Felt Toy Mouse Sewing Pattern

Approximate height: 3″ long

Materials required:

  • Pattern
  • Felt: 12″ x 10″ Grey
  • Filling
  • Cardboard stiffener

Download Free Toy Mouse Sewing Pattern
(requires Adobe Acrobat Reader)

Preparation

Cut 2 body sides, 1 overbody, 1 underbody, 2 ear and 1 tail. Cut 1 cardboard stiffener for underbody.

How to make the felt toy Mouse – Sewing instructions

All seams are glove stitched on the right side.

Using two strands of cotton, join overbody to body from B to A; next join underbody to body from B to A and insert the cardboard stiffener.

Stuff the mouse quite firmly and stitch the seam. Fold ears in half and stitch into position as in photograph.

Fold tail lengthways and stitch from C to D, sew X on tail to X on overbody.

For whiskers sew three long black stitches each side of nose. Stitches for eyes in pink or suitable colour cotton.

Squeak!!!

Filed Under: Felt Toy Animals

Monkey Sewing Pattern Free

December 13, 2019 by David Allen Leave a Comment

Free Toy Felt Monkey Sewing Pattern

Approximate height: 13″

Materials required:

  • Pattern
  • Felt: Brown 31″ x 12″
  • Felt: Fawn 6″ x 8″
  • Felt: Small piece yellow for banana
  • Stranded cotton: 1 skein each of Brown, Fawn and Yellow
  • 1 x pair brown glass eyes
  • 4 ft. 16 gauge wire
  • Filling
  • Adhesive tape (sellotape/sticky tape – only need a short bit)

Download monkey sewing pattern free = >>>
(requires Adobe Acrobat Reader)

Preparation

From the brown felt cut 1 underbody, 1 tail, 2 body, 2 ear, 1 head gusset, 2 hand, 2 foot.

From the fawn felt cut 2 ear, 2 hand, 2 foot, 1 face.

Cut one yellow banana.

How to make the felt Monkey toy – Sewing instructions

All seams are glove stitched on the right side unless otherwise stated. Using two strands of cotton, join one body piece to under- body from A to B, from C to D, and from E to F. Join the second body piece to the underbody in the same manner.

Sew in the head gusset to each body piece from G to H. Continuing down the back to opening for stuffing. Sew from A to J. Sew the face from K to L on the wrong side and make 2 eye slits 3/16″ long. Before joining face to body, sew a small piece of felt behind the eyes, catching both sides of face with small stitches. This will stop eyes receding too far into head. Turn the body inside out and sew in face on wrong side from K to M and back to K. Turn right side out. Sew the two piece for each hand from C to B. Join the hands neatly to the arms, placing B to B and C to C. The feet are made in the same way as the hands, and sewn to the legs, placing D to D and E to E.

Prepare the wire for arms and legs (see General Instructions). 16 1/2″ are required for the arms and 16 1/2″ for the legs. Lightly stuff the hands and feet before inserting wires. Bend these to shape for arms and legs, insert into body, and complete the stuffing. Sew up the opening. Sew the tail and lightly stuff the end. Bend a 10″ piece of wire to curve slightly at one end, binding each end with adhesive tape. Insert wire into tail, stuff and close the seam. Join tail to body where indicated to pattern.

Emphasize the Monkey’s lower lip by back-stitching round the edge of the fawn felt with brown stranded cotton, as in the photograph, then work another line of backstitches just above to indicate upper lip. Suggest the nose with a few short stitches.

Sew in the eyes (see General Instructions) placing the top of the eye just under the slit in the felt to suggest the eyelid. Work a line of backstitches from the inner corner of each eye for 3/4″ to accentuate the nose (as in photo). Make the ears, sewing from N to P and attach to head where indicated on pattern. Mark the division of the fingers and toes with backstitches, taking the stitches through the double thickness of felt.

Oooo Oooo!!

Filed Under: Felt Toy Animals

Free Koala Sewing Pattern

December 13, 2019 by David Allen Leave a Comment

Free Toy Felt Koala Sewing Pattern

Approximate height: 10″

Materials required:

Pattern

  • Felt: Grey 30″ x 12″
  • Felt: Black 6″ x 6″
  • Stranded cotton: 1 skein each Red, Blue, Grey and Black
  • Pair Brown Glass Eyes
  • Filling

Download Free Koala Sewing Pattern =>>>
(requires Adobe Acrobat Reader)

Preparation

From the grey felt cut 2 side body, 1 front head, 1 back of head, 1 chest piece. From the black felt cut 1 nose and 4 claws.

How to make the felt toy Koala – Sewing instructions

All seams are glove stitched on the right side unless otherwise stated.

Sew nose seam on face on wrong side from A to B. Now turn to right side.

Stitch darts on wrong side of black nose piece. Turn to right side, place on nose seam and stitch into position 1/4″ below A. Join front head piece to back head piece from C, over the head to C.

Join side bodies down from D to E. Place right side of back and front arm pieces together with one black claw piece in between. Join at the section marked “claw” by oversewing the three thicknesses together on the wrong side.

Complete the other three claws in the same manner.

With the body wrong side out, place the head inside, stitch the head to the body at neck – matching B to B, D to D, G to G, and C to C. Turn the toy right side out – pull claws out to shape.

Join from G at neck around arms and legs to F.

Stuff the toy with filling, ears first – very softly, then the remainder firmly. Finish sewing around the base from F to F. A few blind stitches along the ears will keep the filling in place.

Sew in the eyes (see General Instructions). Tie a bow of ribbon around Koala’s neck.

G’day mate!

Filed Under: Felt Toy Animals

Next Page »

Copyright © 2026 · Wellness Pro on Genesis Framework · WordPress · Log in