• Skip to main content

Maple Reviews

David Allen

What is a Walking Foot?

December 13, 2019 by David Allen Leave a Comment

Sometimes when you sew multiple layers of fabric, like with quilting or upholstery work, you’ll notice the layers tend to go together unevenly. It’s incredibly frustrating as you sew and unsew seam after seam. Sometimes you can just add a ton of pins along the seam to stop this, but it’s much more efficient to use a walking foot.

A walking foot has its own set of feed dogs to move the top layer of fabric, while the bottom feed dogs on your machine move the bottom layer. This means your thick stack of fabric moves along at an even pace and you don’t get weird wrinkles or bunches in your sewing.

You can buy industrial sewing machines with a built-in walking foot. These are designed to sew only straight and are often used by quilters and upholsterers. This type of walking foot includes a “needle feed” which means the top and bottom feed dogs and the needle all move in conjunction so the fabric is advanced to the back in one smooth step. They make sewing leather, canvas and quilts much easier, but they’re not always necessary–especially if you have a high quality machine to begin with

Home machines can have a walking foot, too. But it doesn’t work quite the same way as an industrial. In this case, there’s no needle feed and the walking foot isn’t actually “walking”. It’s just assisting in moving the layers of fabric better than a smooth-bottom foot would. Some home machines include a walking foot in their standard accessories. But if yours didn’t, don’t worry. You can purchase a walking foot for almost any machine at your local fabric store or online. It simply snaps or screws onto your needle bar just like any other specialty presser foot. There are no special settings you need to worry about.

Helpful hints:

Make sure you purchase the correct foot for your machine’s make and model.

Use a walking foot when you have more than two layers of fabric, or you’re sewing thicker fabrics like denim or canvas.

A good walking foot eliminates the need for lots of pins. In fact, some people skip the pinning step completely.
Filed Under: Others

Book Review: 1,000 Clever Sewing Shortcuts & Tips

December 13, 2019 by David Allen Leave a Comment

I’ve known about this book for a while now, and finally had a good look at it this week. What a treasure! It’s like having your own private sewing teacher on hand all the time. Hundreds of sewing teachers, actually, because the book is mostly written by regular visitors to PatternReview.com. The book takes the best tips from a community of over 200,000 members. Plus you get mini-tutorials from master teachers and designers like Susan Khalje, Kenneth D. King, Anna Mazur and more.

You can just open the book and start reading. Most of the tips are little more than a paragraph long, but solve some of the most frustrating sewing problems like:

  • Fitting problem areas
  • Sewing zippers and pockets
  • Organizing your stash
  • Sewing with difficult fabrics like velvet, fleece, chiffon and lame
  • Using tricky trims like feathers and ribbon

But this is not just a great coffee table book, it’s a useful reference volume, too. The overall chapters are organized into general topics. So, you can find a quick answer to your immediate problems. The chapters include:

  • Sewing gear
  • Setting up your sewing room
  • Design and pattern prep
  • Fabric, thread and notions
  • Layout, cutting and marking
  • Fitting
  • Sewing
  • Finishing
  • Embellishments

Because the tips are written by regular people who sew all the time, the solutions are practical and easy to understand. When you finish reading a section on linings, for example, you’re left with the feeling that it really isn’t that difficult. It makes you really want to go tackle that scary technique and overcome the stumbling block once and for all.

The only thing I didn’t like about this book was that I wasn’t able to put it down. Each tip led to another and another and before I knew it, I spent hours reading and planning new projects in my head (when I should have been upstairs sewing.)

I highly recommend this book for anyone who sews, or wants to sew. It would make a fabulous gift, sure to be loved and used regularly for a long time. It’s available in paperback from your local bookstore or online at Amazon.com.

Filed Under: Others

Tricks for Sewing Faux Sequin-Glitter Dot Fabric

December 13, 2019 by David Allen Leave a Comment

Now that Halloween’s over, I’ve had a chance to talk with some people about their experiences with sewing costumes. Many of them used “glitter dot” fabric (that polyester stuff with the mylar dots glued on) and said they were so frustrated sewing with it. The needle gets stuck; the dots come off on your iron; they gum up your machine. One person even said “why do they even sell this stuff if you can’t use it?”

I’m right there with you. Sewing dance and skating costumes for so many years, I can’t help but sew with glitter dot now and then. The main reason people have a hard time sewing this stuff is that the heat and friction from the sewing process melt the glue and release the dots. Fortunately, there are a few tricks that help make the process easier.

1) Use a fresh sharp needle, even though the fabric itself is a knit. A ball-point needle won’t penetrate the dots, or at least not gracefully.

2) Lubricate the needle with a silicon liquid like Sewer’s Aid (available in the notions section of your local fabric store.) If you’re in a pinch, you can just rub candle wax on the needle.

3) Use a high quality thread (that hasn’t been sitting in the sun.)

4) Don’t press unless you have to, and then use low heat and only on the back side of the fabric (and use a pressing cloth.) Heat softens the glue and melts the dots. It’s a mess you really don’t want to deal with.

5) Try to sew most of your seams “right sides together” so the dots can’t escape onto your needle. If you have to topstitch, you might want to use some wash away stabilizer over the dots. Then just rinse it away when you’re done sewing.

6) Sew as slowly as you can, to avoid heating up the glue.

7) If the needle becomes gunky with glue build-up, you can use rubbing alcohol or nail polish remover to clean the needle (don’t forget to reapply the lubricant.)

When you’re finished with the project, discard your needle and give your machine a good cleaning out. You don’t want any stray dots or fuzz to stay inside the mechanical parts. Do you have any tricks for sewing with glitter dot? Share them with us in the comments.

Filed Under: Others

How to Get Rid of Large Amounts of Fabric Scraps

December 13, 2019 by David Allen Leave a Comment

I hate throwing fabric away. There are lots of great uses for scraps. But I use so much fabric, my scrap pile can sometimes get out of control and threaten mutiny. Keep those little soldiers in line by making a conscious effort to use them up whenever possible. Or better yet, get rid of whole baskets full at a time. Clear out the old and make room for the new. Here are a few ways to use up your scraps in a big way. Remember, anything more than a half-yard isn’t a scrap. Cut off the small bits, fold it up and put it on your shelf. (Your yardage limit may vary. Especially if you’re a quilter or make small items.)

Make a true patchwork quilt.

None of this matchy-matchy, fancy patterned quilts. Just cut up your scraps and sew ’em together. If you’re not into finishing quilts, you can donate sewn quilt tops to a variety of charity quilt programs.

Use fabric scraps for stuffing.

Whenever I need to stuff a pillow, a toy, even a duct-tape dress form, I try to use up scraps of fabric that are really too small to do anything with. Snips and clips of leftovers can be stored in one bag, so you can just reach in and pull out the amount of stuffing you need.

Use fabric scraps instead of styrofoam when shipping packages.

This is a great one, especially around holiday time. When you have to ship something delicate, just pad around the object with your scrap fabric. Don’t use too much, though, or you’ll wind up paying a bundle for extra shipping.

Use natural fiber scraps as firestarter.

I live in northern New England, so I’m constantly starting fires in our wood stove five or six months out of the year. I take linen or cotton scraps and wind them into a tight roll. Dip them in melted wax (recycled from old candle stubs.) Let them dray and keep them by the wood pile. The wax helps the fabric burn a long time, so I need less kindling.

Donate your extras:

Here are a few places to drop off larger sized scraps. If these places say they don’t use fabric, offer to teach a class for them.

Theater costume departments

  • Schools–either to art classes, sewing classes or a theater department
  • Pre-schools or daycare centers
  • Retirement homes
  • Scouts or after-school programs
  • Sunday school programs

If you sew regularly and find you often have an unruly scrap pile, make it a habit to get rid of all of it at least once a year. Don’t feel guilty or sad, just do it. The new empty space in your sewing room will give you peace of mind. Besides, it’ll be full of new scraps in a month or two anyway.

Filed Under: Others

Why do you want to sew your own clothes?

December 13, 2019 by David Allen Leave a Comment

I’ve been thinking a lot about comments people are making on Twitter and Facebook. It’s just amazing how many reasons people have for wanting to learn how to sew. Some people want to make curtains and cute home decor items. Some people want a creative outlet or something to do that doesn’t involve a computer or TV screen. Lots of people, it seems, are obsessed with learning to sew in order to make their own clothing.When I ask them why they want to do that, I get a few responses over and over.

I want to sew my own clothes because I don’t like the fashions in the stores.

This is a great reason to learn sewing. It’s tremendously satisfying to see an image of a dress or fancy jacket in your head and then be able to reproduce it. You don’t need grand schemes to be the next Donna Karan or YSL, for most people it’s enough to be able to make clothing for themselves and their loved ones. But just learning the basics of sewing isn’t going to get you where you want to go. You also need to understand how clothes are put together. How do you take a two-dimensional pattern piece and create a three-dimensional shape that fits with other shapes to make a whole garment? It’s not difficult, but it does take some study. You’ll want to learn draping (how to create pattern pieces using a real body or dress form.) Pattern drafting is a useful skill, too, but unnecessary unless you plan to reproduce your designs over and over.

I want to sew my own clothes because nothing in the stores fits me.

Another great reason to learn sewing. Mass manufactured clothing is designed to fit an “average” shape in average sizes. The funny thing is almost no-one fits the average. And we all have features we like to show off or hide. Unfortunately, this season’s styles in the stores may accentuate what you wanted to minimize. It’s so frustrating to finally find a blouse style that looks amazing on you, only to have it disappear from stores for the next 12 years. Again, studying draping and fitting techniques will serve you well once you’ve graduated beyond pillow cases and curtains. Commercial patterns are a good start, but you’ll soon find that they, too, are made for “average” sizes. So, it’s important to know how to modify patterns to fit *your* body.

I want to sew to save money.

This is a toughie. Sewing your own clothes often ends up costing you more money than just purchasing a similar item in the stores. Fabric by the yard isn’t cheap, and if you make mistakes or buy too much fabric, that’s even more expensive. You also have to factor in thread, needles, interfacing, patterns and a host of other supplies. Manufacturers can sell garments cheaply partly because they purchase all their supplies in massive quantities, which reduces the overall cost.

This doesn’t mean you can’t save money by learning to sew. You just have to be smart about it.

1) Get the highest quality sewing machine you can afford. You want it to last a long time and have little or no issues that require repairs.

2) Recycle fabrics as much as possible. Yard sales, thrift stores and your friends’ closets are a great source of cheap (or free) fabric. You don’t have to start with fabric by the yard. You can easily cut up old clothes and use them to make brand new items. Some of my favorite garments came from old blue jeans that didn’t fit me anymore. Old bedspreads can turn into beautiful skirts. Even stained or worn-out items can become pillow stuffing or quilt filling. The next time you go out to buy fabric, especially when you’re just learning, try to think of a way to reuse some fabric that might be lying around.

3) Reuse notions like buttons, hooks and eyes and zippers. Before you recycle any fabric or throw away a worn-out garment, strip it of all useful pieces. Buttons, especially, really add up when you have to buy them new.

So what about you? Why do you want to sew your own clothes? And what tips do you have that might help a beginning seamstress? Give us a comment, won’t you?

Filed Under: Others

Healing Doll Sewing Pattern & Making

December 13, 2019 by David Allen Leave a Comment

This pattern works well for an Earth Goddess or Fertility Doll, too!

You can print these instructions, or save them to your computer by clicking on “File/Save” in your browser’s tool bar above. Then right click on each image below and save each image, too. When you are offline, open your browser (choose “work offline” if it asks), click on “File/Open” and choose this page. You can then read the instructions as you go.

Print the sewing pattern, too, of course. Check scale marks (1″/cm) and resize if needed.

SUPPLIES:

12″ x 18″ rectangle woven fabric such as muslin
several locks of washed wool, uncarded, or yarn or hair fiber of choice
flavored drink mix, 2 or more packets each flavor (color) desired
vinegar (optional)
squirt or spray bottles, 1 per color of drink mix
crystals, beads, charms, ribbons, etc. as desired
tacky glue or glue gun
pencils or markers (optional)
lightweight cardboard or plastic template material

SUPPLY NOTES:

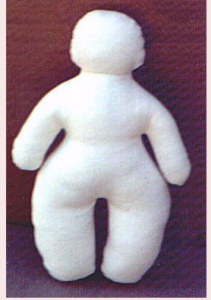
I used plain muslin in the doll pictured. You can use any woven fabric, as desired. Choose appropriate prints, fabric you have dyed, etc. – whatever strikes your fancy! If you are making the doll for yourself, use the piece of fabric you just can’t bear to get rid of, or the one you can’t really afford but just had to buy!

When using flavored drink mixes to dye fabric, use at least 2 packets per ¼ cup water (directions will follow). Pale colors such as yellow require up to 5 or 6 packets for a bright shade. Experiment on scraps of fabric to get the shade you want.

For squirt bottles, I save the ones that come in my hair dye (shhh! Don’t tell!), but you can buy similar ones at a beauty supply store. Ketchup and mustard containers work all right, but the holes are so big you get too much liquid for fine color control.

What is a healing doll?

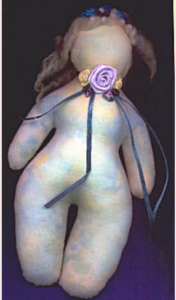
A healing doll is made with the intention of healing the maker or the receiver. You can choose colors, crystals, herbs and potpourri that are said to help with certain conditions. You can add charms of significance, or use special fabrics. A mourning doll can be made with the loved one’s old clothing, perhaps a lock of hair, and a favorite piece of jewelry. A fertility doll could be made with baby-print fabric. Go with your first instincts when choosing what to use!

If you are making a doll for a friend, either pick your colors according to the table later in these instructions, or ask your friend what colors she’d prefer. It is said that we are drawn to the colors we need for balance. For fun, make yourself a doll with whatever colors and crystals grab your eye. (Warning, this method can be hazardous to your wallet!) Then read through the charts to see what your choices signify. How does that correspond with your life right now? Do you see some old wounds appearing in your choices?

1. Gather everything together for your sewing project.
2. Prewash fabric to remove sizing.

3. Trace pattern onto template cardboard or plastic. Cut just INSIDE the line you drew – you will be cutting the line off. This is necessary to keep the sizing correct, so the arms and legs will turn properly.

4. With pencil, tailor’s chalk, or disappearing marker, trace around template on wrong side of folded fabric.

5. Stitch along traced line, leaving open where shown.

6. Trim close to stitching line with pinking shears leaving ¼” seam allowance at opening, OR cut out leaving 1/8″ seam allowance (1/4″ at opening) and clip curves.

7. Turn right side out and stuff firmly. If desired, add a muslin packet filled with potpourri or herbs of your choice, making sure that stuffing is between packet and doll body all around. Ladder stitch opening closed

8. Separate wool into 6 or 8 locks. Find the cut end of each lock — usually the wider end. Tie a knot close to the end of cut end of locks. (note: if using yarn or colored doll hair, add hair after doll is dyed and dry.)

9. Glue or sew knots along seam on top of head. Make the hair stand up on end if you want a wild look, or lay the hair so it falls down the back.

Healing Doll Sewing 1

1o. Get your sewn doll and other supplies for this sewing project together (full list of supplies in part one).

11. Fill a squirt or spray bottle with ¼” cup water, 1 Tablespoon vinegar and 2 or more packets of flavored drink mix. Shake well until mix dissolves. Fill one bottle for each color desired.

12. For soft, blended colors, wet doll with lukewarm water before dying. Leaving the doll dry will give more definition to the colors.

Healing Doll Sewing 2

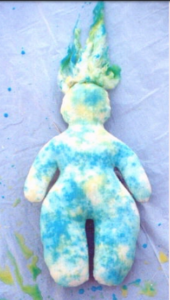
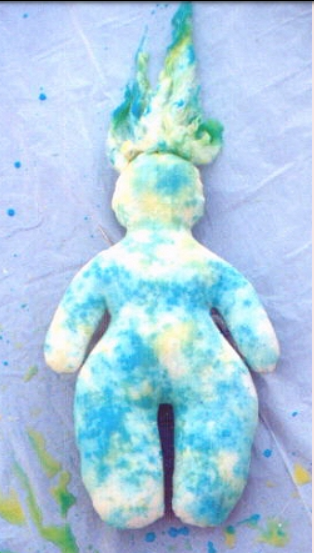
13. Lay doll on plastic sheet (trash can liner) in a safe place, or lay doll in the bottom of your bathtub. Fan the hair upward so you can dye it, too.

14. Now, have a blast! Squirt, spray, stand back and look, then squirt and spray some more! The wool will probably require more dye to get the same color. When you are satisfied with the color, rinse in lukewarm water until water runs clear.

15. Set doll aside in a warm place to dry.

16. When doll is dry, add crystals, beads, ribbons, lace, etc. If desired you can add a simple face, or use markers to enhance the design of the fabric.

17. Sign and date your doll!

Healing Doll Sewing 3

18. At this point, you can follow your own beliefs before giving away the doll. You might say a prayer, or picture the receiver being free of sorrow, illness, or whatever end result you are hoping for. You can add a hang tag or card with a poem or prayer with your wishes. If the doll was for yourself, many times just the making of the doll, the thoughts and memories experienced while working on the doll, is enough to begin your healing.

Filed Under: Doll

« Previous Page
Next Page »

Copyright © 2025 · Wellness Pro on Genesis Framework · WordPress · Log in